Facebook readers, click here to be able to see today's Featured Animation. It's Thursday, and of course that means that you get another featured animation from around the world. And since I just finished up my Animation Production class, today's featured animation is from none other than yours truly.
For our class this month, we worked in teams of two to create a short (extremely short) tennis match. Each person was to animate two shots, the first animating the serve and one return, and the other person animating two returns. All of the models, rigs and textures were provided for us, we were to concentrate on just the animations.
"Two tennis shots? That's like... 4 seconds Dan. Tops. Sounds pretty easy."
Well it's not exactly Toy Story, but we were to try and make these animations look as close to "production quality" as possible. We weren't going for absolute realism, just something that's believable and entertaining to watch. Also, if we wanted to be an "Animator" for our demo reel, we needed to score a 90% or better in this class. So the pressure's on.
"Ok enough yammering. Let's see some animation!"
Woah there bud. Not so fast. First, we start with some real life reference. This will be used as a starting point for our animation. Here are the references for my two shots.
After we do some rough thumb nails (hand sketched storyboard type things) of what we think the action will be like, we go into our first animation pass. This early on, we basically block in the important poses, just enough to "tell the story."
At this point we're trying to match poses between the real life reference and our scene.
Here's a few screen grabs for comparison.
Continuing on from there, we'll block in some of the "in betweens" - basically filling in the gaps and hammering out the details of what's going to happen.
Keep in mind, at this point the animation is just skipping from pose to pose. Even though it might look somewhat "fluid" it's just a slide show. Your mind is filling in the gaps. Between that pass and the final animation the computer will fill in some of those gaps, although I'll have to make a lot of adjustments to the way it does things to make it look better than just moving from point A to point B.
At this point in my animation career, it's very much trial and error. If something doesn't look right, you tweak it a little bit, try to find a better pose, and create another quick "playblast" (real time video to see the animation as it will look full speed), and assess if the changes you made are working or not. After any series of changes I'd make another video like this one, then watch to see if what I had done made things better or worse.
As the animation progresses, you start to move away from the reference a little bit, exaggerating certain areas and completely overhauling others. For example, in the Andy Roddick reference he kind of shorts the shot - he was in too close to the ball - so when he swings his arm is kind of crammed up against his body. In my animation, I chose to pull his arm out further away from his body so that it would look like a more powerful swing. That's just one example of the many eventually differences between the reference and my final scenes.
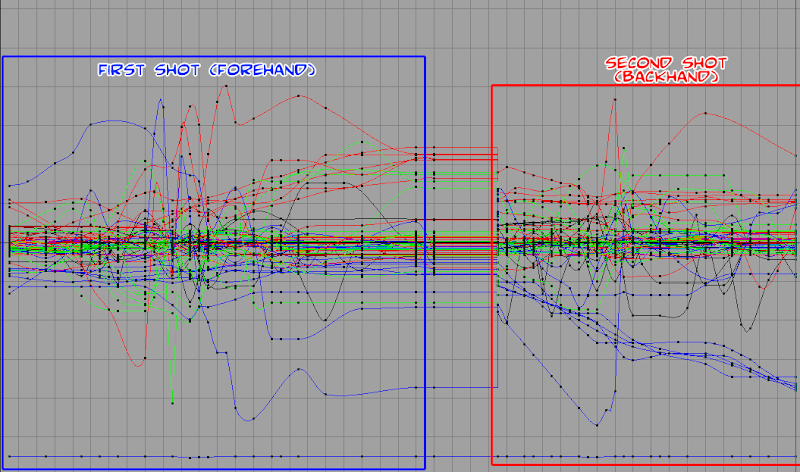
Also for this final pass, I have to go in and tweak all of the different animation curves. For this particular model, there were approximately 20 different controls (elbows, hands, feet, hips, etc), each with anywhere from 6 to 20 different variables that could be adjusted for any moment in time (translate x, y, z, rotate x, y, z, etc.) In the Graph Editor, you go into each curve and smooth out things, adjust the timing, add or remove keyframes, and so on. Here's a picture of all of the curves for each of the two shots.
You can isolate the different curves of course, and zoom in and out to concentrate on particular areas. I'm not working with that mess as is!
All of that leads to the final animation. There's certainly more to be done here, (there's no facial animation for example), but with the time constraints of the class this was where I had to leave it.
Once the animation was finalized, I rendered out the final image. This is when all the textures are applied and and motion blur is added (to make things FEEL faster). Each frame (at 24 frames per second) took about 5 minutes to render. To give you an idea of how simple this is, one frame of Transformers, if rendered on a single machine, would take 38 hours.
That's why they use more than just a single Macbook Pro for rendering over at
ILM.
Once my partner and I had rendered out our separate scenes, we combined them to form "A Tennis Game." Enjoy!!
(Jose animated the blue tennis player, while I animated the red clad guy).
So that's it. A combined two months of work for 18 seconds, most of which was credits or titles. Still, I really enjoyed working on it, and hopefully you found the breakdown of the process at least a little interesting.
If you just came here just wanting a comic, come back Monday. I'll have one for ya. But in the meantime, the boys over at
Enliv have switched to a Monday / Thursday schedule. What's today again...?


